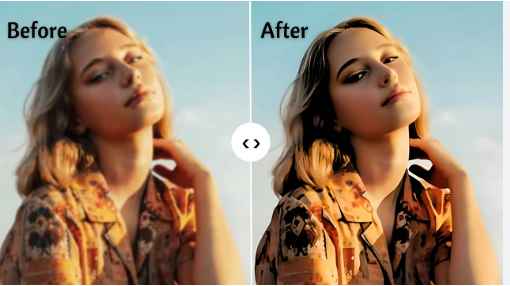
We all love capturing memories, right? But let’s face it—nobody wants a grainy, low-resolution photo when they could have an 8K masterpiece that looks like it was pulled straight from a blockbuster movie. High-quality photos aren’t just for professionals; they’re for anyone who wants their images to shine. So, how do you take your normal photos and turn them into stunning 8K-quality marvels? Let’s dive in!
Understanding Image Quality
What Is Photo Resolution?
Photo resolution is essentially the number of pixels that make up an image. The higher the number of pixels, the better the clarity and detail.
The Difference Between Normal and 8K Quality
A normal photo might have a resolution of 1080p or 720p, but 8K quality? We’re talking about 7680 x 4320 pixels. It’s like comparing a bicycle to a spaceship—worlds apart!
| The Tools You’ll Need |
Software Options
To enhance your photos, software like Adobe Photoshop, Topaz Gigapixel AI, or free tools like GIMP can work wonders.
Hardware Requirements
A decent computer with a good GPU is essential for processing 8K images. Trust me, you don’t want to crash your old laptop mid-edit!
| Preparing Your Photo for Enhancement |
Choosing the Right Image
Not all photos are created equal. Start with a photo that’s already in decent shape; blurry images will only go so far.
Checking Initial Resolution
Before diving in, check your image’s resolution to see how much work it needs.
| Enhancing Photo Quality Using AI Tools |
Top AI Tools for Photo Enhancement
AI-powered tools like Topaz Gigapixel AI and Let’s Enhance are game-changers in transforming ordinary photos into 8K-quality works of art.
Step-by-Step Guide to Using AI
- Upload your photo to the software.
- Select the resolution or quality setting.
- Let the AI do its magic.
- Save the enhanced photo in a high-quality format.
| Manual Photo Editing Techniques |
Adjusting Brightness and Contrast
Sometimes, a little tweak in brightness and contrast can make a world of difference.
Sharpening Details
Tools like Photoshop’s “Unsharp Mask” can bring out intricate details that make your photo pop.
| Free vs. Paid Tools |
Pros and Cons of Free Tools
Free tools are great for beginners, but they often lack advanced features needed for true 8K quality.
Why Paid Tools Might Be Worth It
Investing in paid tools can save you time and deliver superior results—worth every penny if you’re serious about quality.
| Best Practices for Optimal Results |
Avoiding Over-Editing
Over-editing can make your photo look fake. Keep it natural!
Understanding File Formats
Saving your enhanced photo in formats like PNG or TIFF ensures minimal loss of quality.
| Common Mistakes to Avoid |
Overcompression
Compressing your image too much can ruin its quality. Always opt for minimal compression.
Unrealistic Expectations
Remember, not every photo can be turned into an 8K masterpiece. Manage your expectations!
| Output Formats and Compatibility |
Best Formats for 8K Quality
JPEG2000, PNG, or TIFF are ideal formats for maintaining 8K quality.
How to Ensure Universal Compatibility
Always check if your enhanced photo works well across devices and platforms.
Tips for Storing Enhanced Photos
Avoiding Data Loss
Back up your images in multiple locations—cloud storage, external hard drives, you name it.
Cloud vs. Local Storage
Cloud storage offers convenience, but local storage gives you control. Why not use both?
Conclusion
Achieving 8K quality isn’t as complicated as it sounds. With the right tools, techniques, and a bit of patience, you can transform ordinary photos into stunning, high-resolution works of art. Just remember to keep things natural and store your masterpieces safely!


